Thursday, July 23, 2009

A Vacation by the Shore--Virtually


I guess you have to face your fears, even when they’re not real life fears, so I registered to get a Second Life. I picked a name and the goofiest avatar I could find. I could not stop laughing when I met other second-life folks, thinking about how goofy I looked. I talked briefly to a few people—evidently Thursday evenings are pretty slow around ISTE Island. I walked on down to the campfire circle and “got comfy.” The Quickstart guide is quite helpful. It wasn’t long before I was really enjoying the fire and watching the dolphins play in the surf. In my real life I’m a birder, so I was very pleased to find that Second Life has hawks and owls! I finally tore myself away from the fire and went over to the playground. I read the signs and picked up a few tips. Then I got on the swing. I had a great time, but it was just like a real swing; after you get going, how do you get off? Then I saw the tree house. I went over, expecting steps or a ladder, but finally realized I had to fly up there. After a few tries I made it. I even sent myself a postcard from my vacation on the shore. When I finally looked at the clock, two hours had gone by! I took one last flight out over the ocean.

Wednesday, July 22, 2009

Get a Second Life


I have to admit, Second Life looks a bit scary. It's hard to imagine myself as a cartoon or avatar with high-on-the-head pigtails and big green eyes--I mean, these women look like they're wearing a bra on the outside of their shirts! The Health Education in Second Life wiki has a very helpful introduction, including this tip: "We recommend spending 10-20 hours in Second Life." And that's just for the introduction! With time always scarce, does the investment of time in learning how to use Second Life pay off in terms of professional development and networking? Here's a video made by the International Society for Technology Education (ISTE) with people who emphatically say that it does. One tells us that Second Life gives her "constant access to the most current and relevant topics that are of interest to me and my school," and allows her to engage in "conversation with some of the most forward-thinking and creative minds in the field of educational technology." Other voices coaxing me out of my comfort zone are found in the archive of the weekly talk show in Second Life, "ISTE Eduverse Talks." Watching last week's show allows me to peep "inworld" without having to wear butterfly wings. Shows are Tuesdays, 5 PM SLT (Second Life time), which I believe is 7PM CDT.

Friday, July 17, 2009

Read, Write, and Share with a Class Blog


I recently attended a session at K12 Online Conference; "Using Web2.0 Tools in a Grade One Classroom." Even though the presentation is from 2006, it was the most emailed session listed. Kathy Cassidy of Moose Jaw, Saskatchewan, Canada started a blog with her 1st grade classroom using Blogmeister. Her students posted their thoughts about what thtey had learned in words, pictures, video and audio podcasts. They used their KidPix artwork to decorate the blog. We use KidPix quite a bit with our younger students. I had not thought about how easy it would be to export the student artwork as jpegs, upload to Flicker as Cassidy did, and then embed in a blog or wiki. I was impressed that they posted podcasts as well as video. The class shared their blog with a class in New Zealand, prompting lots of interest in that country as well as in reading their partner blogs. Partnering with a far-away school is a great idea for a class blog. Blogmeister can help with this since on the log-in page, you can select a state or country and "browse for bloggers." Parents and grandparents visited the blog, read the posts and left comments. Her students were excited to write in the blog and were thrilled to see how many people had visited and viewed their work. Having an audience is so motivating for students--and teachers--of any age.

Wednesday, July 15, 2009

Tapped In

No teacher is an island--at least, you shouldn't be in this age of nings, listserves, wiki, etc. TappedIn is a real standout among professional learning communities. It's a free service with a helpful staff that can guide you around the different areas of the community. There are groups for librarians, world language teachers, art teachers, those interested in project-based learning, primary grades, middle school--you get the picture. As soon as I registered, I received a chat message from the information desk in the "lobby," with helpful suggestions. The "Enhanced Lessons" group has a wiki with a dozen tutorials for web 2.0 tools, like Delicious, VoiceThread and BubbleShare. In my wanderings among the groups, I found 17 links that I will use later in my classroom, adding them to my Delicious page. To imagine the possibilities of this community, read this amazing letter from a teacher in Illinois and one in Brazil who have brought their students together online for discussions. Here's a short tutorial created by one of the "Enhanced Lessons" group, or check this one from YouTube.

Tuesday, July 14, 2009

Change Blogmeister's Template

Ready for a new look? Watch this short video to find out how to change the look of your blog page on Blogmeister, a blogger designed for k12 students.

Add a Photo to Blogmeister with Picvault

There a few steps to adding a photo to Blogmeister. You need a host site for the photo, such as Picvault. I run through the steps here:

Let Your Computer do the Talking!

Let your computer talk back, using TextEdit. Find it in the Applications folder. Type your blog post and TextEdit will read it back to you to help you find errors.

Getting Started with Class Blogmeister

Here's a short tutorial I made for my students about logging in and writing a post for ClassBlogmeister.

Friday, June 26, 2009

Inukshuk on VoiceThread

VoiceThread is a fascinating tool! The user posts a photo or a slideshow of photos. Then he or she comments on the photo, with text, audio recording (called in over a phone), or video from a webcam. The creator's picture appears on the left; click on it to hear the dialogue. With VoiceThread, anyone can comment, either by text, audio or video. Each commenter is represented with a picture, right or left. Not only is this a slideshow with audio, it's a conversation--sort of like a wiki with audio and video, and it can be done from a cell phone. Some that were interesting:
  • Students in a lit circle added comments about their book.
  • A participant at an edtech conference took a photo of himself at the conference with a speaker, then invited others to add their comments on the spot.
  • After showing a video, a teacher asked her students to give their reaction to the video on a variety of stills from the film. Sharing seems to be disabled on this one.
I choose to embed the one below because it's an intriguing way to use VoiceThread. Graham Wegner of Australia asks a question to anyone in Alaska. A viewer in Canada answers. Perhaps the next time I check this VoiceThread others from around the world will have added their responses.

Wednesday, June 24, 2009

Free Web Tools for Schools

This slideshare presentation is packed with free web tools and includes brief suggestions and samples of their use. Includes tools for presentations, photo editing, video conferencing, bookmarking, , video and audio sharing, online collaboration, wikis, blogs, mind mapping, online books and more! Slideshare itself is a great free web tool for sharing your PowerPoint etc. presentations with others.

Tuesday, June 23, 2009

Wild Card Search with Google *

Use a wild card search when you can use any term between your key words. For example, I'd like to find a favorite movie or book for a teen. Enter the search terms favorite * for teens. I use this TeacherTube video by "Renesadae" for my "Better Search" unit with middle school. Click the title of this post for a link to posters for your class about how to search.

Friday, June 19, 2009

Online Quiz maker throw down!


I investigated two online test-creating and grading tools: QuizStar and ClassMarker. Both offer time-savers for teachers and instant feedback for students. Both allow the teacher to manage class lists and register students. Tests or quizzes can be saved, even shared with another instructor. Quizzes can be duplicated in order to create different versions. Questions can be framed as multiple choice or true/false, can be displayed with an image, or written in different languages. The instructor can set a time limit for the test. Students can see their score immediately after taking the test, in points and percentage. If the instructor allows it, the student can review each question to see the correct answer and points for each. Tests are automatically graded (that’s the best part) and scores are available to the teacher.
Now the differences: ClassMarker gives you all of the above for free! QuizStar costs $24.50 for 6 months, $39 for a year. For that price, QuizStar will also give an analysis of the scores by class, student or question in Excel format. ClassMarker provides analysis too in their “Pro” version (also in Excel), which costs $24.95 per year. For the extra 50¢, ClassMarker not only gives an extra 6 months, but provides some other useful features. In the “Pro” version, ClassMarker will email results to the instructor. ClassMarker has a setting that will randomize the question order, making it harder to copy your neighbor while taking the test in the computer lab. The free text question (fill-in-the-blank) allows the instructor to list up to 10 acceptable responses. QuizStar allows free text too, but these must be graded by the instructor and the scores adjusted manually. I took ClassMarker’s sample quiz. It was easy to read, with A, B, C, etc., listed in a column on the left. QuizStar’s answer choices are listed in a row underneath the question, which I think is a bit harder to follow. The look and feel of the test on ClassMarker was sleek; QuizStar seemed a bit old-fashioned by comparison.
Online tests can serve as study guides. Students that have Internet access at home can take the quiz to prepare for an in-class test. Quizzes can be assigned as homework, either for a grade, or as a review. The great thing is that there is a record of the students who reviewed and those who did not. If your classroom has “clickers” (hand-held input devices that communicate with an interactive whiteboard), you probably won’t use these test tools during class time. But if you don’t, and your class has access to computers to take tests, online tests are awesome. Teachers who do not have access to computers or Internet in their classroom may want to get the free ClassMarker account for the ease of creating a clean-looking test that can be printed.

Wednesday, June 17, 2009

Confidence and the Future


Fun, exciting, colorful, engaging--this is summit of “Lesson Plan Peak.” The ideal lesson is not only an activity that carries new skills and concepts for the students, but also one that helps create a love for learning. Here’s what comes to my mind: finger-painting. Our kindergarten teacher prepared us, handing out special paper and aprons. Pots of paint waited on the broad tables. At last we could dive in. I remember the cool paint, the sunny room, and the lines my fingers made on the paper, streaks of dark and light.
As a computer teacher, I’d like my own lessons to be a memorable as finger painting, but how can mere machines compete with pots of paint? The first time I taught 4th grade how to insert a picture into a document I was stunned. An excited buzz filled the air and they abandoned chairs to see their classmates’ work. At the end of the period, a few students forgot their pencil cases, but no one forgot the color printout.
I don’t teach how to insert a picture into a paragraph for its own sake. I know that by the time my 4th graders students leave college, the process of manipulating text and images will have changed. I hope that the skills of giving commands to a machine in order to express an idea in words and color will empower them. According to Ed Barlow, by 2010, technical information will double every 72 hours! Whether this is precisely true I can't say, but I know that the information technology my 4th graders will be using in 2021 will bear little resemblance to the 10-year-old computers we use today. We must employ technology in education today, so they will have the confidence to explore, creating things that I can’t yet imagine.

Friday, May 29, 2009

Number 1 tip for new SmartBoard Users

1. As they say in sci-fi movies, we’re not alone! There are many generous educators out there in the World Wide Web who share their lessons, create tutorials, and help teachers keep it fresh! Try my page of links at Delicious.com/AnneMcCormack.
PS: I really do mean Worldwide. British educators have been posting their advice, gallery items and tutorials for years now. It’s useful to know that in the UK, it’s not a SmartBoard; it’s an IWB (interactive white board). One of the best sites is 100 Interesting Ways

Thursday, May 28, 2009

#2 Tip for new SmartBoard users: Save page as Gallery Item

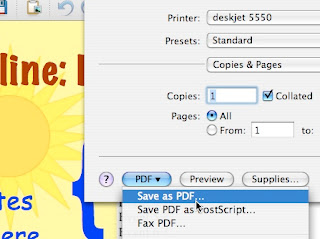
2. Gallery: In my elementary & middle school computer classes, I often post a page showing the print dialog with instructions about how to print at the end of a project. Although I knew about the Gallery, it hadn’t occurred to me how useful it would be to keep some of my own pages there. Saving a page as a Gallery item means that it can be instantly added to any lesson. Under File, choose “Save page as Gallery item.” Here’s the weird part—it now saves it on desktop (or in Documents), leaving you to load it into the Gallery. That’s easy enough, if you know you’re supposed to do it. Click on Gallery, and then select “My Content” in the list. Use the triangle drop-down menu to choose “Add to my Content,” then browse till you find the file you just saved; or simply drag it from the desktop into your “My Content” folder. To access it later, click Gallery, My Content, and find it in the list. Choose “Insert in notebook,” as with any Gallery item.

Saturday, May 23, 2009

Tip #3: PDFs


3. Homework Help: This is my favorite new trick. Under File, export your Notebook lesson as a PDF. That brings up the print dialog again. This time choose “Full page” as described in Tip #4. Name the file and save it to the desktop. The advantage of saving it as a PDF is that anyone can open it, whether or not they have your software. Also, they will see it with your fonts, whether or not their system contains them. Now you can email it to an absent student. An even better idea might be to upload the PDF version to your school web page. Students can then view it on the web, or download it and print it if they wish. It’s useful to remember that Macs can save any file as a PDF—just go to the print dialog, but instead of hitting “Print” on the bottom right, choose “PDF” on the bottom left.

Thursday, May 14, 2009

Tip #4: Printing Notebook files
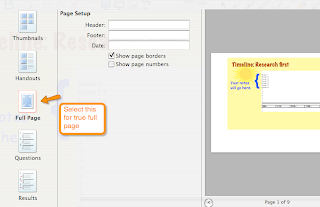

4. Printing: I teach in a computer lab. Machines are arranged in a horseshoe with an island. Not only does this mean that none of the chairs face the SmartBoard, but some of the younger ones have trouble seeing over the monitors even when they turn to look. And since my students vary widely in their ability absorb instructions and navigate through menus, some need the information displayed on page 4 although I’m am displaying page 5, while others are ready for 8. Solution: Print and distribute the whole file. Notebook thumbnails can be printed in what the dialog box calls “Large;” i.e., 2 slides to a printed page, medium (4 slides to a page), or small (6 per page). The thumbnail “full page” gives you a framed, horizontal slide in the middle of a vertical page—a waste. The true, horizontal full page is the third option on the left; full page. If you’d like room on the page for notes, choose “handouts”—large means 1 per page, medium is 2, small is 3 per page. Interesting but mysterious: colors print truer from the PDF version than they do directly from Notebook software.

Wednesday, May 13, 2009

Top tips for SMARTboard use: Tip #5 Rename Page

5. Rename page: When I started using Notebook software for the SmartBoard, I didn’t pay much attention to the thumbnails of all the pages displayed when not in “full-screen.” As I created and used more files however, I found that the tiny pages on the side helped me transition to the next item in the lesson. Renaming the pages is even more helpful, reminding me how much I have to cover in my remaining class time. By default, each page is named with the time it was created. Right-click (or control-click for Mac users) on the name and it turns blue to allow you to name it with something useful.

Monday, March 23, 2009

Animated Timeline

I have to pause in my series of tips for new SMARTboard users to talk about a great website: Timetoast. Building a timeline is a great opportunity for students to research, trace the development of a trend, and put it in a larger context. I use MS Word for timelines with students in my computer classes. The callouts on the drawing toolbar serve as markers on the line. But wouldn't color, animation, and the web make it even more exciting? Try Timetoast. It's a free website that allows you to create timelines, post them on their site, and add them to a web page. Enter the events in any order. Add a short explanation, link, and photo if you choose. Timetoast arranges the events in callouts along a timeline. The viewer mouses over the line and the events pop out with title and thumbnail photo. Clicking on an event reveals the text, link, and larger photo. Here's a sample I made, Shakespeare's Plays.

Sunday, March 22, 2009

There's Got to Be a Better Way! Copy Notebook Page

Tip #6 for new users of SMARTboard/Notebook: I begin a Notebook file for a lesson on research paper for my 8th grade and a different introductory file for my 6th grade. Now it occurs to me that my review page in the 8th grade file would work very well for other class too. I select all; then copy—uh-oh, text and images are locked. Up to Edit > Select all locked items, then command-u to unlock. Copy all; then to the 6th grade file, add a new page, then paste. Finally, add the page background from the Gallery or Format > Page background again. Nine steps—there’s got to be a better way! There is: Line up the 2 Notebook files so that the thumbnails show. Just drag the thumbnail of the page to be copied into the other file. Done.

Saturday, March 21, 2009

Select all Locked Items

Tip #7.  The first time I attempted a Notebook page--that's the software designed for SmartBoard--with animations and hyperlinks, I worked on it for quite some time. At last it was finished. But I had misspelled one of my links. That sent me back to the animation/link-lock jail described in Tip #8. I ended up deleting the page, then starting over. Of course, once I deleted it, other pages that were linked to it didn’t work either. Frustration like this can lead to some pretty bad grammar. The cure: Under the Edit menu at the top is something I had overlooked: “Select all locked items.” Clicking this of course selects everything you so carefully locked, and now you can use command-u to unlock them all. Fix the ones that need fixing, then select all (command-a), and lock (command-L) again. Mental health is restored.

Friday, March 20, 2009

Lock Last

Tip #8 for new users of SMARTboard and its software, Notebook. Here's a great time waster: Add animation to 5 or 10 text boxes--say, spin--then try to lock them. Every time you click a box, it spins so can't access the menu. The cure: Take care of your color, animations, links, etc. As the last step, use command-a to select all. Notebook selects the text boxes and images that are not locked. Use command-L to lock them all without starting the animations or activating links; or use the pull-down menu to choose "Lock > Allow move" for all items at once.

Wednesday, March 18, 2009

Stuttering Finger--Won't You Give?

Tip #9: Lock: Many of my carefully prepared Notebook lessons--"Notebook" is the software designed for the SMARTboard--were pounded to mush as students tried to drag words into the right category—a condition called “stuttering finger.” The student touches the text box; the finger slips and taps again. This double-click opens the text box for editing, whereupon, the next slip rearranges the order of the letters till the lesson is unintelligible. The cure: Lock. Select the text box, pressing on the downward-pointing triangle to choose “Lock.” If you prefer, use Command-l. In the case of a text box that needs to be placed somewhere else on the page during the lesson, choose “Allow move”--no keyboard shortcut for this.  Now the words in the text box cannot be changed until you use the same pull-down menu to “unlock”--or Command-u.

Saturday, March 14, 2009

Freeze! Tips for New SmartBoard Users

New to SMARTboard? These are my top ten tips for new users of Notebook, the software designed for the SMARTboard, starting with number 10.

Tip #10: I've just put up the instructions for the assignment on the SmartBoard. Just then I remember that there’s an important email to check. I used to just wait to use the computer for this or any other task till the SmartBoard wasn’t needed. Then I learned about “freezing.” There’s a button on the remote for the projector labeled “freeze.” It captures the picture and doesn’t allow it to change till you hit “freeze” again. So, check your email, print an extra set of instructions or another copy of the parent newsletter, then return to your presentation and hit “freeze” a second time. Seamless.

Thursday, March 12, 2009

Put the World back in the Wide Web

It's great to be reminded that there's more out there than my small circle. A blog by Tom Barret, a teacher in Nottinghamshire, England, has awesome advice about applying interactive technology in the classroom. His blog, "ICT in My Classroom," often focuses on what we call Smartboards or Promethean Boards in the US--they're IWBs (interactive white boards) in the UK. "ICT" stands for Information and Communication Technology in Britain, Europe, and elsewhere, and refers to computer-based learning. This blog has a huge amount of material. Use the top menu to access the "Ed Tech Roundup" podcast (subscribe in iTunes), video tutorials, and wikis. I tried the "Creating a Befuddlr puzzle from a SMART Notebook page" project--it works great! One of the greatest resources ever for SmartBoard is the Google Presentation he designed, "Thirty-Eight Interesting Ways to Use Your Interactive Whiteboard." If you don't look at any other education sites, you have to check "38 Interesting Ways," and the presentations that followed. It's my all-time favorite education post! I come back to these "Interesting Ways" presentations again and again. Link

Daily Bookmarks

"It's all about the small potatoes," says Jerry Swiatek. He's the technology specialist from a central Florida school district that shares ideas in his blog "Thoughts from a Tech Specialist." He describes his purpose: "Taking a technology that some people have never heard of nor seen and making them comfortable enough with it to make a difference in their teaching." Whether he posts a few lines about several web sites, or an in-depth page about one technology innovation for teachers, his enthusiasm and energy for his job inspires. One of my favorite posts shared "Simply Box." He showed how it works as well as presenting uses for the site in the classroom. I've subscribed to some of the blogs I found on his list on his blog, and I've gotten links from his Delicious bookmark site, "jerthebear." I get a kick out of the "Live Traffic Feed" that shows users visit his blog from various countries.

Wednesday, March 11, 2009

Da Big Leap: A Blog Review

After reading Rebecca Blood’s article about the two types of blogs, I realize that for education issues, I prefer the “filter” type rather than the “web log.” I subscribe to a number of blogs, using Google Reader to “aggregate” them. Like a morning newspaper written just for me, they appear on my start page. I doubt that I’d read any blogs at all without my Reader packaging them conveniently for me. The “filter” blog searches the web for obscure items of interest or links with “how to” lessons. These are more useful to me than blogs of personal sharing, rants, and the like. I admit however that I seldom make it through my Google Reader page before some of the items are weeks old. When I read a how-to or an experimental lesson, I like to try it out. This takes lots of that scarce commodity, time. Certain writers have proven that their contributions are worth the time.

One that's worth the time is called “The Teacher Teacher,” written by “dabigleap”-- a technical trainer from Columbia, Missouri. He often writes about SmartBoard use, which is of particular interest to me since I’ve had one in my classroom for a year. If you haven’t used SmartBoards, a year may seem like plenty of time to learn the tricks of the trade, but I’m just beginning to realize its potential. In a February 23, 2009, post he explains how to use lessons in other formats, ex., PowerPoint, and turn them into an interactive activities at the SmartBoard. He describes how to change the blanks of the worksheet to text boxes, and working with the “Ink Aware” toolbar, transform the working into a game, engaging all the students in the discovery process. Next, he explains how to import an existing PowerPoint lesson into Notebook—as the software for the SmartBoard is called—and not only keep the advantages of your work in PowerPoint, but add to the interactivity of Notebook. I had known about Ink Aware tools in the SmartBoard system, but I never understood the advantages of using them. He explains how to engage students in writing notes on the SmartBoard and how to savethem to be used as part of the lesson. “Dabigleap” writes in a casual style about technical tips for classroom teachers. He often links to other blogs or web pages with more information. His entries are sometimes very short, sometimes more in depth. He keeps his advice practical, without philosophy, politics, or unsupported predictions about Technology Utopia. I like that.