1. As they say in sci-fi movies, we’re not alone! There are many generous educators out there in the World Wide Web who share their lessons, create tutorials, and help teachers keep it fresh! Try my page of links at Delicious.com/AnneMcCormack.
PS: I really do mean Worldwide. British educators have been posting their advice, gallery items and tutorials for years now. It’s useful to know that in the UK, it’s not a SmartBoard; it’s an IWB (interactive white board). One of the best sites is 100 Interesting Ways
I teach computer education in an elementary school. Here's what a mild-mannered computer teacher found while rolling down the side streets of educational technology.
Friday, May 29, 2009
Thursday, May 28, 2009
#2 Tip for new SmartBoard users: Save page as Gallery Item
2. Gallery: In my elementary & middle school computer classes, I often post a page showing the print dialog with instructions about how to print at the end of a project. Although I knew about the Gallery, it hadn’t occurred to me how useful it would be to keep some of my own pages there. Saving a page as a Gallery item means that it can be instantly added to any lesson. Under File, choose “Save page as Gallery item.” Here’s the weird part—it now saves it on desktop (or in Documents), leaving you to load it into the Gallery. That’s easy enough, if you know you’re supposed to do it. Click on Gallery, and then select “My Content” in the list. Use the triangle drop-down menu to choose “Add to my Content,” then browse till you find the file you just saved; or simply drag it from the desktop into your “My Content” folder. To access it later, click Gallery, My Content, and find it in the list. Choose “Insert in notebook,” as with any Gallery item.
Saturday, May 23, 2009
Tip #3: PDFs

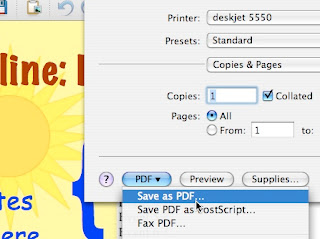
3. Homework Help: This is my favorite new trick. Under File, export your Notebook lesson as a PDF. That brings up the print dialog again. This time choose “Full page” as described in Tip #4. Name the file and save it to the desktop. The advantage of saving it as a PDF is that anyone can open it, whether or not they have your software. Also, they will see it with your fonts, whether or not their system contains them. Now you can email it to an absent student. An even better idea might be to upload the PDF version to your school web page. Students can then view it on the web, or download it and print it if they wish. It’s useful to remember that Macs can save any file as a PDF—just go to the print dialog, but instead of hitting “Print” on the bottom right, choose “PDF” on the bottom left.
Thursday, May 14, 2009
Tip #4: Printing Notebook files

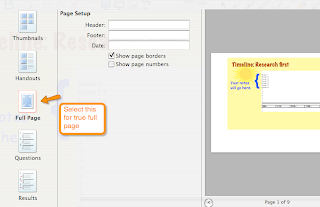
4. Printing: I teach in a computer lab. Machines are arranged in a horseshoe with an island. Not only does this mean that none of the chairs face the SmartBoard, but some of the younger ones have trouble seeing over the monitors even when they turn to look. And since my students vary widely in their ability absorb instructions and navigate through menus, some need the information displayed on page 4 although I’m am displaying page 5, while others are ready for 8. Solution: Print and distribute the whole file. Notebook thumbnails can be printed in what the dialog box calls “Large;” i.e., 2 slides to a printed page, medium (4 slides to a page), or small (6 per page). The thumbnail “full page” gives you a framed, horizontal slide in the middle of a vertical page—a waste. The true, horizontal full page is the third option on the left; full page. If you’d like room on the page for notes, choose “handouts”—large means 1 per page, medium is 2, small is 3 per page. Interesting but mysterious: colors print truer from the PDF version than they do directly from Notebook software.
Wednesday, May 13, 2009
Top tips for SMARTboard use: Tip #5 Rename Page
5. Rename page: When I started using Notebook software for the SmartBoard, I didn’t pay much attention to the thumbnails of all the pages displayed when not in “full-screen.” As I created and used more files however, I found that the tiny pages on the side helped me transition to the next item in the lesson. Renaming the pages is even more helpful, reminding me how much I have to cover in my remaining class time. By default, each page is named with the time it was created. Right-click (or control-click for Mac users) on the name and it turns blue to allow you to name it with something useful.
Subscribe to:
Comments (Atom)